Patent Drawings are an integral component of the patent filing process as underlined by U.S. Patent and Trademark Office (USPTO). The federal agency responsible for managing patent applications mandates all applications be accompanied by patent drawings if they are required to understand the working of the invention. This rule is applicable to all types of patents including utility patents.
This guide elaborates on various aspects of patent drawings including- their importance, rules of submission, illustration tools, submission tips etc., that will be useful in gaining practical knowledge of this crucial requirement.
Table of Contents
What are Patent Drawings?
A patent drawing is an illustration that explains the detailed features of an invention to make it easy to comprehend. High-quality drawings that can convey the invention and its workings clearly to the examiner are an added advantage when filing for patents. Therefore, it is vital that the importance of patent drawings should not be overlooked. The following are the types of patent drawings that may be used to support your patent documents:
- Utility
- Mechanical
- Drawing-graph
- Electronic
- Schematics and flow-charts
- Perspective views
- Sectional views
- Drawing-exploded
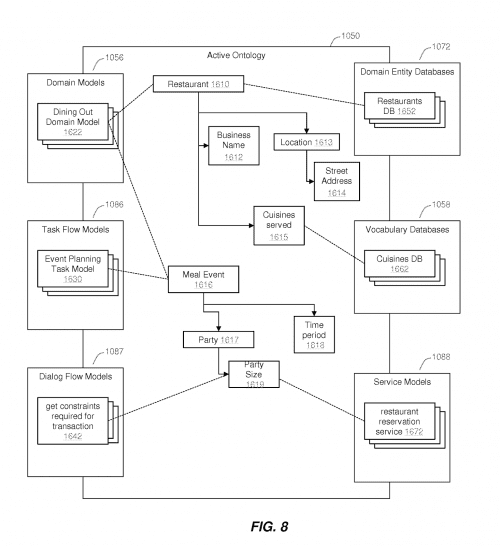
The above image is an example of a flow chart of Intelligent Automated Assistance (US20120016678A1)
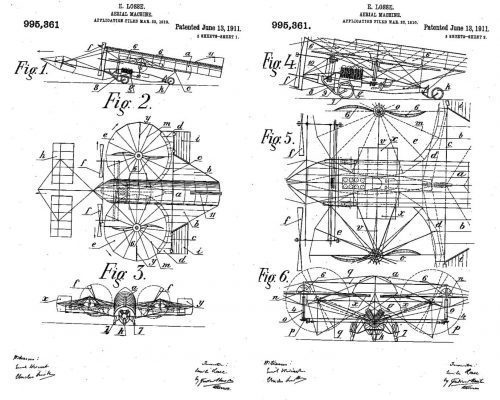
The above image is an example of a mechanical drawing of an aerial machine by Emile Losses (US Patent Specification 996,361).
Points of Rejection
Patent drawings are prone to rejection on certain grounds laid down by the USPTO. If you are keen on learning how to draw a blueprint for an invention, then it is crucial to know these points so that your drawing is accurate and meets the eligibility criteria.
- Line Quality
- Text Height
- Grayscale Drawings
- Sheet Margin Rejection
Poor line quality with non-uniform thickness is often rejected. Ensure that the lightest weight of line used for even shading is at least 0.1mm.
Remember to keep the height of the letter at a minimum of 0.32cm. Anything lower than that becomes ineligible and could face rejection
Line art form is the best to use unless the invention strictly requires a grayscale drawing. Colored drawings too must be used only in cases where it is absolutely necessary.
If the drawing spills out of sheet margins, then this too can be grounds for rejection. If you are using an A4 sheet then the rules are: Top margin – 2.5 cm (1 inch), left-side margin – 2.5 cm (1 inch), right-side margin – 1.5 cm (5/8 inch), bottom margin – 1 cm (3/8 inch).
Pros & Cons of Drawing Yourself
One can either learn how to draw a blueprint for an invention or hire an expert for the task. Below are the advantages and disadvantages of both:
Hiring a draftsperson
- Up Side
- Down Side
There is no dearth of firms offering professionals who can make your drawings. Such professionals are well versed with the patent drawing requirements listed down by USPTO and can help create drawings that will be accepted by the federal agency. Besides, they help save the immense time and effort required to create compliant drawings.
The hitch with hiring a professional is the high cost involved. Professional drafters are much in demand and may charge anywhere between $75 to $150 per sheet. In the case of complex drawings, these charges are likely to plummet higher. Also, each patent is usually accompanied by a minimum of 2 drawings. Besides the costs, another factor to consider is that one loses one’s hold on the drafting process which could result in additional edits that need to be paid. So overall, it is a costly exercise and suitable only if you have the funds to bear all expenses.
Doing it Yourself
- Up Side
- Down Side
Drawing yourself can be an extremely tedious yet satisfactory experience if done correctly. Apart from being inexpensive, self-made patent drawings also help you design marketing brochures for potential clients/buyers. Being the inventor, you understand your innovation the best and thus can translate it most accurately on paper. Working with professionals, no matter how experienced, will mean plenty of to-and-fros before you get the ideal design.
The not-so-advantageous part of doing a patent drawing yourself could be a lack of access to the right tools and accuracy required to achieve such technical drawings that meet the patent drawing requirements. This may deter inventors from dabbling in patent drawings. However, with some external help, these challenges can easily be overcome.
How to Create Your Own Drawings
If you’ve opted to create your own drawings, then below are a few pointers that will aid you in achieving this successfully:
Line drawings done with pen and ruler are ideal. A special type of ink with carbon particles, called India Ink is used for this purpose. Since there is little room for error, it helps to learn basic drawing techniques in order to attain the best results. Perspective views in drawings are preferred as they clearly depict all details of an invention.
Color drawings must only be used if they are absolutely necessary to convey the invention of your details. If you are submitting color drawings, then keep in mind the following:
- Attach three sets of illustrations
- Submit an application explaining why a color drawing is essential
- Pay petition fee
- Mention the presence of color drawings in your patent application
Photographs are rarely allowed to be submitted as patent drawings when filing for a patent. The only exception is cases where the best way to present a drawing is through a photograph. Cell cultures and crystalline or plant cultures are some examples of cases where photographs may substitute for patent drawings.
CAD or Computer Aided Drawing programs are a boon for those who do not understand the basics of drawing. If you are inclined to make the patent drawing yourself then CAD is the ideal solution. They are extremely simple and can be used by anybody with or without drawing skills. Plus, they offer ease of correction in case of errors. With the help of a scanner and digital camera, CAD can easily be used to create 3-D drawings of your invention.
The only drawback of CAD is that the equipment is fairly expensive to invest in and is only useful if you need to continuously file for patents. Adobe Illustrator, Smart Draw, DraftSight, CorelDraw, and OmniGraffle 7 FreeCAD, Inkscape, LibreOffice Draw are some options to consider for patent drawings.
Summing Up
Quality patent drawings are a vital part of the patent filing process. They help you highlight the uniqueness of your patent to the examiner. The crucial decision in the case of drawings is whether to draw them on your own or to seek professional help. This decision will depend on various factors like costs, experience etc. Whichever option you select, the ultimate objective is to fulfill the provisional patent application drawing requirements in order to avoid your patent application from being rejected.
About TTC
We’ve constantly identified the value of new technology carried out by our pretty skilled executive crew with backgrounds as our professionals. Like the IP professionals we empower, our starvation for development is never-ending. We IMPROVISE, ADAPT, and IMPLEMENT in a strategic manner.
TT Consultants offers a range of efficient, high-quality solutions for your intellectual property management ranging from
- Patentability Search
- Invalidation Search
- FTO (Freedom to Operate)
- Patent Portfolio Optimization
- Patent Monitoring
- Patent Infringement Search
- Patent Drafting & Illustrations
and much more. We provide both law firms and corporations in many industries with turnkey solutions.
Contact Us